Introduction to Screw Straightness & Defects
A lack of screw straightness can become a critical factor in any application. Bent lead screws can cause noise, premature wear and failure, high drive torque, and excessive heat. But straightness requirements vary widely from application to application, and straightness is an expensive and perishable product feature. For these reasons it is important to understand what straightness is, how it’s measured, how it can be achieved, maintained, lost, and restored.
Type of Straightness Defects
Defects Figure 30 illustrates the three principle types of straightness defects. The first, and most common, is a “bow” defect. It consists of a simple bend in one plane, as shown in Figure 30 (a). The second type is a “snake” defect, which exhibits multiple bends in a single plane as shown in Figure 30 (b). And the third type, in Figure 30 (c), is a “corkscrew” defect, characterized by multiple bends in multiple planes.

FIGURE 30
Measuring Straightness
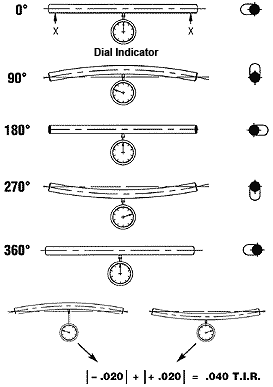
Screw straightness is measured by placing a screw onto two “V” or roller supports and rotating the screw 360° against a dial indicator. The operator then notes the indicator readings at the extreme height and depth during the rotation. The sum of these indicator readings is the total indicator reading or TIR. Straightness is usually specified in terms of TIR which is typically expressed in thousandths of an inch (i.e. “.015 TIR”). See Fig. 31 for an illustration of the process.

FIGURE 33